Clean enumerations using xmacros

Introduction

In this short article, we will discuss a classical C++ engineering problem: storing meta data alongside enumeration values (such as their string equivalent). The solution we will end up with is based on so called "xmacros", a not so well known C-inherited trick.

The problem

Let's consider a simple case: You have to store some enumerations representing colors. Something of the kind:

// --- color.h
enum Color
{
  RED,
  GREEN,
  BLUE,
  PURPLE,
  YELLOW,
  _COLOR_MAX
};

One day or another, you will have to dump these enumerations, either for debugging or logging purpose. A typical solution would be to store their string equivalent in an other container, and remember to update it accordingly when you add a new color.

// --- color.h
#include <string>

enum Color
{
  RED,
  GREEN,
  BLUE,
  PURPLE,
  YELLOW,
  _COLOR_MAX
};

std::string colorName( Color c );

// --- color.cpp
#include "color.h"

#include <cassert>

static const std::string colorNames[] =
{
  "RED",
  "GREEN",
  "BLUE",
  "PURPLE",
  "YELLOW"
}

std::string colorName( Color c )
{
  assert( c<_COLOR_MAX );
  return colorNames[c%_COLOR_MAX];
}

Maintaining these meta data is a pain. You data is spread in multiple parts, and one could easily forget to maintain either one of these containers.

X macros

The whole idea behind X macros is to store the enumerations in macros instead of directly defining enumerations. Consider the following example:

enum Color
{
#define X(code) code,
  X( RED    )
  X( GREEN  )
  X( BLUE   )
  X( PURPLE )
#undef X
};

Going one step further, we could extract the `X(...)̀ declarations in a clean macro list, outside the enumerations scope.

#define COLOR_LIST \
  X( RED    )      \
  X( GREEN  )      \
  X( BLUE   )      \
  X( PURPLE )

enum Color
{
#define X(code) code,
  COLOR_LIST
#undef X
};

You should start to understand what we are doing here. By exporting the color list outside of the enumeration scope, we now have the possibility to declare a similar container for color string equivalents!

#define COLOR_LIST \
  X( RED    )      \
  X( GREEN  )      \
  X( BLUE   )      \
  X( PURPLE )

enum Color
{
#define X(code) code,
  COLOR_LIST
#undef X
};

static const std::string colorNames[] =
{
#define X(code) #code,
  COLOR_LIST
#undef X
};

Possible improvement: definition files

The C++ standard does not allow arbitrary length lines to be parsed. In fact, compliant compilers are only required to be able to parse at least 4k characters. This directly implies that we will not be able to store very long enumerations in the same list macro. Most of the time, this problem is solved by exporting all xmacros in a separate .def file that you can later include where you need it:

// --- color.def
X( RED    )
X( BLUE   )
X( GREEN  )
X( PURPLE )
X( YELLOW )

// --- color.h
enum Color
{
#define X(code) code,
#  include "color.def"
#endif
};

Possible improvement: multiple meta data

Keep in mind that you do not need to deduce all needed meta data from a single xmacro argument, you can store whatever you need, and tweak the xmacro definition to your likings:

// --- color.def
X( RED,    "Red",   0xFF0000 )
X( GREEN,  "Green", 0x00FF00 )
X( BLUE,   "Blue",  0x0000FF )

// --- color.h
enum Color
{
#define X(code,name,mask) code,
#  include "color.def"
#endif
};

static const std::string colorNames[] =
{
#define X(code,name,mask) name,
#  include "color.def"
#undef X
};

static unsigned int colorMasks[] =
{
#define X(code,name,mask) mask,
#  include "color.def"
#undef X
};

A complete example

Here is a complete example of the use of xmacros. We use the NARGS trick (https://groups.google.com/d/msg/comp.std.c/d-6Mj5Lko_s/5R6bMWTEbzQJ) to retrieve the number of colors without having to pollute the Color enumeration with _MAX_COLORS.

// --- color.h
#ifndef COLOR_H
#define COLOR_H

#include <string>

#define COLOR_LIST \
  X( RED    )      \
  X( GREEN  )      \
  X( BLUE   )      \
  X( PURPLE )      \
  X( ORANGE )      \
  X( YELLOW )

enum Color
{
#define X(code) code,
  COLOR_LIST
#undef X
};

/**
 * Returns the string equivalent of a color code
 */
std::string colorName( Color c );

/**
 * Returns true if c maps to a valid color code, false otherwise
 */
bool colorValid( unsigned int c );

/**
 * Returns the total count of existing color codes
 */
std::size_t colorCount();

#endif // COLOR_H

// --- color.cpp
#include "color.h"

#include <cassert>

#define NARG(...)  NARG_(__VA_ARGS__,RSEQ_N())
#define NARG_(...) ARG_N(__VA_ARGS__)
#define ARG_N(                             \
   _1, _2, _3, _4, _5, _6, _7, _8, _9,_10, \
  _11,_12,_13,_14,_15,_16,_17,_18,_19,_20, \
  _21,_22,_23,_24,_25,_26,_27,_28,_29,_30, \
  _31,_32,_33,_34,_35,_36,_37,_38,_39,_40, \
  _41,_42,_43,_44,_45,_46,_47,_48,_49,_50, \
  _51,_52,_53,_54,_55,_56,_57,_58,_59,_60, \
  _61,_62,_63,N,...) N

#define RSEQ_N()                \
 63,62,61,60,                   \
 59,58,57,56,55,54,53,52,51,50, \
 49,48,47,46,45,44,43,42,41,40, \
 39,38,37,36,35,34,33,32,31,30, \
 29,28,27,26,25,24,23,22,21,20, \
 19,18,17,16,15,14,13,12,11,10, \
  9, 8, 7, 6, 5, 4, 3, 2, 1, 0

static const std::string colorNames[] =
{
#define X(code) #code,
  COLOR_LIST
#undef X
};

std::string colorName( Color c )
{
  assert( c<colorCount() );
  return colorNames[c%colorCount()];
}

bool colorValid( unsigned int c )
{
  return c<colorCount();
}

std::size_t colorCount()
{
#define X(code) code,
  return NARG(COLOR_LIST)-1;
#undef X
}

// --- main.cpp
#include <iostream>
#include <cstdlib>

#include "color.h"

int main( int argc, char** argv )
{
  std::cout << "Red   code is " << RED   << std::endl;
  std::cout << "Green code is " << GREEN << std::endl;
  std::cout << "Blue  code is " << BLUE  << std::endl;
  std::cout << std::endl;
  std::cout << "Red   name is " << colorName(RED  ) << std::endl;
  std::cout << "Green name is " << colorName(GREEN) << std::endl;
  std::cout << "Blue  name is " << colorName(BLUE ) << std::endl;
  std::cout << std::endl;
  std::cout << "Code 0 is valid? " << colorValid(0) << std::endl;
  std::cout << "Code 5 is valid? " << colorValid(5) << std::endl;
  std::cout << "Code 6 is valid? " << colorValid(6) << std::endl;
  std::cout << std::endl;
  std::cout << "Total color count: " << colorCount() << std::endl;
  
  return EXIT_SUCCESS;
}
Boost.PreProcessor

An other possibility would be to use Boost.PreProcessor (http://www.boost.org/doc/libs/release/libs/preprocessor/doc/index.html). An advantage of this alternative is that you have a full featured macro framework to manipulate your enumerations. Here is a quick sample of what you may end up with:

// --- color.h
#include <string>

#include <boost/preprocessor/seq/enum.hpp>

#define COLOR_LIST \
  (RED   )         \
  (GREEN )         \
  (BLUE  )         \
  (PURPLE)         \
  (YELLOW)         \
  (ORANGE)

enum Color
{
BOOST_PP_SEQ_ENUM(COLOR_LIST)
};

std::string colorName ( Color        c );
bool        colorValid( unsigned int c );
std::size_t colorCount();

// --- color.cpp
#include <cassert>

#include <boost/preprocessor/seq/elem.hpp>
#include <boost/preprocessor/seq/size.hpp>
#include <boost/preprocessor/seq/transform.hpp>
#include <boost/preprocessor/stringize.hpp>

static const std::string colorNames[] =
{
#define OP(s,data,element) BOOST_PP_STRINGIZE(element)
BOOST_PP_SEQ_ENUM(BOOST_PP_SEQ_TRANSFORM(OP, 0, COLOR_LIST))
#undef OP
};

std::string colorName( Color c )
{
  assert( colorValid(c) );
  return colorNames[c%colorCount()];
}

bool colorValid( unsigned int c )
{
  return c<colorCount();
}

std::size_t colorCount()
{
  return BOOST_PP_SEQ_SIZE(COLOR_LIST);
}

// --- main.cpp
#include <iostream>
#include <cstdlib>

int main( int argc, char** argv )
{
  std::cout << "Red   code is " << RED   << std::endl;
  std::cout << "Green code is " << GREEN << std::endl;
  std::cout << "Blue  code is " << BLUE  << std::endl;
  std::cout << std::endl;
  std::cout << "Red   name is " << colorName(RED  ) << std::endl;
  std::cout << "Green name is " << colorName(GREEN) << std::endl;
  std::cout << "Blue  name is " << colorName(BLUE ) << std::endl;
  std::cout << std::endl;
  std::cout << "Code 0 is valid? " << colorValid(0) << std::endl;
  std::cout << "Code 5 is valid? " << colorValid(5) << std::endl;
  std::cout << "Code 6 is valid? " << colorValid(6) << std::endl;
  std::cout << std::endl;
  std::cout << "Total color count: " << colorCount() << std::endl;

  return EXIT_SUCCESS;
}

Clean project management with CMake

Introduction

This article will discuss the use of CMake to manage your application or library. I will go through the steps of building, documenting, testing and deploying your project.

CMake

CMake is a unified, cross-platform, open-source build system that allows developers to build, test and package software by specifying build parameters in simple, portable text files. It works in a compiler-independent manner and the build process works in conjunction with native build environments, such as Make, Xcode, Code Blocks and Visual Studio. It also has minimal dependencies, C++ only. CMake is open source software and is developed by Kitware.

CMake is a robust, versatile tool that can:

  • Create libraries
  • Generate wrappers
  • Compile source code
  • Build executables in arbitrary combinations

The most important thing to note is that CMake is IDE agnostic. You don't have to force your co-workers to use a specific IDE or compiler, CMake will generate a project file for any compiler, any IDE, and on any platform that one may think of.

Application overview

First, let's define our awesome application. It is basically composed of two classes: SimpleProject1 and SimpleProject2.

sampleproject1.h:

#ifndef SAMPLEPROJECT1_H
#define SAMPLEPROJECT1_H

class SampleProject1
{
public:
  SampleProject1();
  ~SampleProject1();
  
public:
  void function();
};

#endif // SAMPLEPROJECT1_H

sampleproject1.cpp:

#include "sampleproject1.h"

#include <iostream>

SampleProject1::SampleProject1()
{
  std::cout << "SampleProject1::SampleProject1()" << std::endl;
}

SampleProject1::~SampleProject1()
{
  std::cout << "SampleProject1::~SampleProject1()" << std::endl;
}

void SampleProject1::function()
{
  std::cout << "SampleProject1::function()" << std::endl;
}

sampleproject2.h:

#ifndef SAMPLEPROJECT2_H
#define SAMPLEPROJECT2_H

class SampleProject2
{
public:
  SampleProject2();
  ~SampleProject2();
  
public:
  void function();
};

#endif // SAMPLEPROJECT2_H

sampleproject2.cpp:

#include "sampleproject2.h"

#include <iostream>

SampleProject2::SampleProject2()
{
  std::cout << "SampleProject2::SampleProject2()" << std::endl;
}

SampleProject2::~SampleProject2()
{
  std::cout << "SampleProject2::~SampleProject2()" << std::endl;
}

void SampleProject2::function()
{
  std::cout << "SampleProject2::function()" << std::endl;
}

main.cpp:

#include <cstdlib>
#include "sampleproject1.h"
#include "sampleproject2.h"

int main( int, char** )
{
  SampleProject1 sp1;
  SampleProject2 sp2;
  
  sp1.function();
  sp2.function();
  
  return EXIT_SUCCESS;
}

Nothing fancy here, we have five files: sampleproject1.h, sampleproject1.cpp, sampleproject2.h, sampleproject2.cpp, and main.cpp.

Our project directory should look like the following:

  • SampleProject
    • sampleproject1.h
    • sampleproject1.cpp
    • sampleproject2.h
    • sampleproject2.cpp
    • main.cpp

Building with CMake

It is now time to look at how to build this project. CMake uses configuration files named CMakeLists.txt containing variables and instructions to build an application.

First steps

Create a file CMakeLists.txt at the root of the project directory and add this line in it:

ADD_EXECUTABLE( sampleproject sampleproject1.cpp sampleproject2.cpp main.cpp )

Here we just informed CMake that we would like to create an executable sampleproject with the listed source files.

Now it is time to generate a project. There is basically two ways to do so: using the console, or using the CMake GUI. Either way, the concept is the same: you have to provide a source directory (where is located the CMakeLists.txt) and a destination (build) directory where project files will be generated. Additionally, you can provide some variables to CMake to tweak the generation.

So here we go, let's create a SampleProject-build directory and call CMake from there.

  • SampleProject
    • sampleproject1.h
    • sampleproject1.cpp
    • sampleproject2.h
    • sampleproject2.cpp
    • main.cpp
    • CMakeLists.txt
  • SampleProject-build
    • call CMake from here
/$ mkdir SampleProject-build
/$ cd SampleProject-build
/SampleProject-build$ cmake ../SampleProject
-- The C compiler identification is GNU
-- The CXX compiler identification is GNU
-- Checking whether C compiler has -isysroot
-- Checking whether C compiler has -isysroot - yes
-- Checking whether C compiler supports OSX deployment target flag
-- Checking whether C compiler supports OSX deployment target flag - yes
-- Check for working C compiler: /usr/bin/gcc
-- Check for working C compiler: /usr/bin/gcc -- works
-- Detecting C compiler ABI info
-- Detecting C compiler ABI info - done
-- Checking whether CXX compiler has -isysroot
-- Checking whether CXX compiler has -isysroot - yes
-- Checking whether CXX compiler supports OSX deployment target flag
-- Checking whether CXX compiler supports OSX deployment target flag - yes
-- Check for working CXX compiler: /usr/bin/c++
-- Check for working CXX compiler: /usr/bin/c++ -- works
-- Detecting CXX compiler ABI info
-- Detecting CXX compiler ABI info - done
-- Configuring done
-- Generating done
-- Build files have been written to: /path/to/SampleProject1-build

Here we called CMake without asking for a specific generator, so it defaulted to Unix Makefiles because CMake detected that I have GNU Make and GCC available.

It is now possible to build the application normally since CMake generated makefile.

/SampleProject-build$ make
Scanning dependencies of target sampleproject
[ 33%] Building CXX object CMakeFiles/sampleproject.dir/sampleproject1.cpp.o
[ 66%] Building CXX object CMakeFiles/sampleproject.dir/sampleproject2.cpp.o
[100%] Building CXX object CMakeFiles/sampleproject.dir/main.cpp.o
Linking CXX executable sampleproject
[100%] Built target sampleproject
/SampleProject-build$ ./sampleproject
SampleProject1::SampleProject1()
SampleProject2::SampleProject2()
SampleProject1::function()
SampleProject2::function()
SampleProject2::~SampleProject2()
SampleProject1::~SampleProject1()

Now since I have XCode installed, I could have asked for an XCode project using the -G argument:

/SampleProject-build$ cmake ../SampleProject -G Xcode
-- The C compiler identification is GNU
-- The CXX compiler identification is GNU
-- Checking whether C compiler has -isysroot
-- Checking whether C compiler has -isysroot - yes
-- Checking whether C compiler supports OSX deployment target flag
-- Checking whether C compiler supports OSX deployment target flag - yes
-- Check for working C compiler using: Xcode
-- Check for working C compiler using: Xcode -- works
-- Detecting C compiler ABI info
-- Detecting C compiler ABI info - done
-- Checking whether CXX compiler has -isysroot
-- Checking whether CXX compiler has -isysroot - yes
-- Checking whether CXX compiler supports OSX deployment target flag
-- Checking whether CXX compiler supports OSX deployment target flag - yes
-- Check for working CXX compiler using: Xcode
-- Check for working CXX compiler using: Xcode -- works
-- Detecting CXX compiler ABI info
-- Detecting CXX compiler ABI info - done
-- Configuring done
-- Generating done
-- Build files have been written to: /path/to/SampleProject1-build
/SampleProject-build$ xcodebuild
=== BUILDING NATIVE TARGET sampleproject OF PROJECT Project WITH THE DEFAULT CONFIGURATION (Debug) ===
...
Build all projects
** BUILD SUCCEEDED **
/SampleProject-build$ ./Debug/sampleproject
SampleProject1::SampleProject1()
SampleProject2::SampleProject2()
SampleProject1::function()
SampleProject2::function()
SampleProject2::~SampleProject2()
SampleProject1::~SampleProject1()

Okay, so we are now able to build multiple C++ files using CMake, but the project layout is far from optimal. We are now going to improve, step by step, our CMakeLists.txt file to support more and more features.

CMake version number

It is always a good practice to explicitly provide the CMake version in use. You can do so by simply adding the following line at the beginning of the CMakeLists.txt:

CMAKE_MINIMUM_REQUIRED( VERSION 2.8 )

ADD_EXECUTABLE( sampleproject sampleproject1.cpp sampleproject2.cpp main.cpp )

If you did not provided a minimum CMake version, you may very well receive the following warning message:

CMake Warning (dev) in CMakeLists.txt:
  No cmake_minimum_required command is present.  A line of code such as

    cmake_minimum_required(VERSION 2.8)

  should be added at the top of the file.  The version specified may be lower
  if you wish to support older CMake versions for this project.  For more
  information run "cmake --help-policy CMP0000".
This warning is for project developers.  Use -Wno-dev to suppress it.

Organizing files

Currently the major problem of our project is that there is no file hierarchy. We need to create a tree-like structure to keep our files well organized. In the present article, we chose the following structure:

  • SampleProject
    • src
      • sampleproject1.cpp
      • sampleproject2.cpp
      • main.cpp
    • inc
      • sampleproject
        • sampleproject1.h
        • sampleproject2.h
    • CMakeLists.txt

Having an extra layer of indirection for headers (the inc/sampleproject directory) will force us to use #include "sampleproject/xxx.h". This is a convenient way to access header files if we need to install our header directory later (in case we are creating a library instead of an application).

Our CMakeLists.txt becomes:

CMAKE_MINIMUM_REQUIRED( VERSION 2.8 )

INCLUDE_DIRECTORIES( inc )
ADD_EXECUTABLE( sampleproject src/sampleproject1.cpp src/sampleproject2.cpp src/main.cpp )

As you should have noticed, the command INCLUDE_DIRECTORIES adds a directory to the include path.

The layout of our project is now clean, but our CMakeLists.txt still isn't all that cool. As in a real program, let's move everything inside variables. This is very easy using CMake, you just have to use the SET( name value ) command. Accessing a variable is done using the ${name} syntax. We end up with:

CMAKE_MINIMUM_REQUIRED( VERSION 2.8 )

SET( PROJ_NAME      "sampleproject" )
SET( PROJ_SOURCES   "src/sampleproject1.cpp" "src/sampleproject2.cpp" "src/main.cpp" )
SET( PROJ_INCLUDES  "inc" )

INCLUDE_DIRECTORIES( ${PROJ_INCLUDES} )
ADD_EXECUTABLE( ${PROJ_NAME} ${PROJ_SOURCES} )

Note that CMake defines a wall set of predefined variables ready for use to use. They all start with the CMAKE_ prefix. We will use this fact to define some more custom variables that we will end up using later.

CMAKE_MINIMUM_REQUIRED( VERSION 2.8 )

SET( PROJ_NAME      "sampleproject" )
SET( PROJ_PATH      ${CMAKE_SOURCE_DIR} )
SET( PROJ_OUT_PATH  ${CMAKE_BINARY_DIR} )
SET( PROJ_SOURCES   "src/sampleproject1.cpp" "src/sampleproject2.cpp" "src/main.cpp" )
SET( PROJ_HEADERS   "inc/sampleproject/sampleproject1.h" "inc/sampleproject/sampleproject2.h" )
SET( PROJ_LIBRARIES "" )
SET( PROJ_INCLUDES  "inc" )

PROJECT( ${PROJ_NAME} )

INCLUDE_DIRECTORIES( ${PROJ_INCLUDES} )
ADD_EXECUTABLE( ${PROJ_NAME} ${PROJ_SOURCES} )
TARGET_LINK_LIBRARIES( ${PROJ_NAME} ${PROJ_LIBRARIES} )

CMAKE_SOURCE_DIR refers to the root source directory containing the CMakeLists.txt file (./SampleProject here) and CMAKE_BINARY_DIR points to the current build directory (./SampleProject-build for us).

The PROJECT( name ) command was also used here. This is not mandatory here, but will create a target for our application executable. You can create as many target projects that you want, to build multiple libraries at the same time for instance.

Notice that we also added the TARGET_LINK_LIBRARIES( target libraries) command that allows us to link with shared libraries. We could for instance use SET( PROJ_LIBRARIES "-gl" ):

/SampleProject1-build$ ldd sampleproject 
sampleproject:
    /opt/local/lib/libGL.1.dylib (compatibility version 1.2.0, current version 1.2.0)
    /usr/lib/libstdc++.6.dylib (compatibility version 7.0.0, current version 7.4.0)
    /usr/lib/libgcc_s.1.dylib (compatibility version 1.0.0, current version 1.0.0)
    /usr/lib/libSystem.B.dylib (compatibility version 1.0.0, current version 111.1.5)

One annoying problem still remains: we have to manually add source files in the CMakeLists.txt. This could be automated if we were able to automatically fill the PROJ_SOURCES with the sources available in the src/ folder. This is exactly what the following line will do for us:

FILE( GLOB_RECURSE PROJ_SOURCES src/*.cpp )
FILE( GLOB_RECURSE PROJ_HEADERS inc/${PROJ_NAME}/*.h )

All *.cpp files under the src/ folder will recursively be added to the PROJ_SOURCES variable. Same will happen for PROJ_HEADERS.

Handling platform-specific issues

OS-specific configuration

Compiler-specific configuration

Managing resources

Documenting with Doxygen

Testing with CTest

Using boost.unit

Deploying with CPack

Playing with cpuid

Introduction

cpuid is an x86 opcode which stands for CPU IDentification. Its primary goal is to provide information on the processor type, features, cache... For instance, if you want to know at runtime if the host processor can handle SIMD instructions, this is the way to go.

Functions

The usage of cpuid is very straightforward. You provide a function identifier in eax, and call cpuid. The result will be stored in eax, ebx, ecx and edx.

The most useful functions are listed below.

Vendor ID String and maximum cpuid function

Retrieve the processor vendor ID string (12 characters) and the maximum callable function number of cpuid.

  • Input
    • eax: 0
  • Outputs
    • eax: maximum function number available
    • ebx: First set of 4 characters of the vendor ID
    • edx: Second set of 4 characters of the vendor ID
    • ecx: Third set of 4 characters of the vendor ID

Processor signature and supported features

Retrieve the family, type, model and ID of the processor, as well as its supported instruction sets.

  • Input
    • eax: 1
  • Outputs
    • eax: Processor family, type, model and ID
    • ebx: Misc (APIC value, logical processors, ...)
    • ecx: Bitmask. Extended features (SS3, ...).
    • edx: Bitmask. Features (MMX, SSE1, SSE2, ...)

MSVC implementation

MSVC provides an easy way to use cpuid: the __cpuid() function.

uint32_t op;_     // input:  eax
uint32_t regs[4]; // output: eax, ebx, ecx, edx
__cpuid( regs, op );

GCC implementation

We need to use inline gas assembly, but there is a trick here. You might expect a simple call like the one above to work:

uint32_t op;  // input:  eax
uint32_t eax; // output: eax
uint32_t ebx; // output: ebx
uint32_t ecx; // output: ecx
uint32_t edx; // output: edx
asm volatile( "cpuid"
              : "=a"(eax), "=b"(ebx), "=c"(ecx), "=d"(edx)
              : "a" (op) );

The problem is that ebx may be used to store the GOT (Global Offset Table) if you build PIC (Position Independent Code). This means GCC won't allow the clobbering of ebx in that case and throw an obscure error message:

error: can't find a register in class 'BREG' while reloading 'asm'

But don't worry, we don't actually have to tell the truth to GCC about our ebx clobbering. All we have to do, is backup ebx before our cpuid call, copy the result that was in ebx elsewhere, and restore its previous value.

uint32_t op;  // input:  eax
uint32_t eax; // output: eax
uint32_t ebx; // output: ebx
uint32_t ecx; // output: ecx
uint32_t edx; // output: edx
asm volatile( "pushl %%ebx   \n\t" // Backup %ebx
              "cpuid         \n\t" // Call cpuid
              "movl %%ebx, %1\n\t" // Copy the %ebx result elsewhere
              "popl %%ebx    \n\t" // Restore %ebx
              : "=a"(eax), "=r"(ebx), "=c"(ecx), "=d"(edx)
              : "a"(op)
              : "cc" );

Complete code

Here is the complete code for GCC and MSVC:

#if defined(__GNUC__)
    #include <stdint.h>
#elif defined(_WIN32)
    #include <intrin.h>
    typedef unsigned __int32 uint32_t;
#endif

/**
 * Calls cpuid with op and store results of eax,ebx,ecx,edx
 * \param op cpuid function (eax input)
 * \param eax content of eax after the call to cpuid
 * \param ebx content of ebx after the call to cpuid
 * \param ecx content of ecx after the call to cpuid
 * \param edx content of edx after the call to cpuid
 */
void cpuid( uint32_t op, uint32_t& eax, uint32_t& ebx, uint32_t& ecx, uint32_t& edx )
{
#if defined(__GNUC__)
  // GCC won't allow us to clobber EBX since its used to store the GOT. So we need to
  // lie to GCC and backup/restore EBX without declaring it as clobbered.
  asm volatile( "pushl %%ebx   \n\t"
                "cpuid         \n\t"
                "movl %%ebx, %1\n\t"
                "popl %%ebx    \n\t"
                : "=a"(eax), "=r"(ebx), "=c"(ecx), "=d"(edx)
                : "a"(op)
                : "cc" );
#elif defined(_WIN32)
  // MSVC provides a __cpuid function
  int regs[4];
  __cpuid( regs, op );
  eax = regs[0];
  ebx = regs[1];
  ecx = regs[2];
  edx = regs[3];
#endif
}

/**
 * Retrieve the maximum function callable using cpuid
 */
uint32_t cpuid_maxcall()
{
  uint32_t eax, ebx, ecx, edx;
  cpuid( 0, eax, ebx, ecx, edx );
  return eax;
}

/**
 * Reference:
 * http://datasheets.chipdb.org/Intel/x86/CPUID/24161821.pdf
 * http://www.flounder.com/cpuid_explorer2.htm
 */
enum CpuidFeatures
{
  FPU   = 1<< 0, // Floating-Point Unit on-chip
  VME   = 1<< 1, // Virtual Mode Extension
  DE    = 1<< 2, // Debugging Extension
  PSE   = 1<< 3, // Page Size Extension
  TSC   = 1<< 4, // Time Stamp Counter
  MSR   = 1<< 5, // Model Specific Registers
  PAE   = 1<< 6, // Physical Address Extension
  MCE   = 1<< 7, // Machine Check Exception
  CX8   = 1<< 8, // CMPXCHG8 Instruction
  APIC  = 1<< 9, // On-chip APIC hardware
  SEP   = 1<<11, // Fast System Call
  MTRR  = 1<<12, // Memory type Range Registers
  PGE   = 1<<13, // Page Global Enable
  MCA   = 1<<14, // Machine Check Architecture
  CMOV  = 1<<15, // Conditional MOVe Instruction
  PAT   = 1<<16, // Page Attribute Table
  PSE36 = 1<<17, // 36bit Page Size Extension
  PSN   = 1<<18, // Processor Serial Number
  CLFSH = 1<<19, // CFLUSH Instruction
  DS    = 1<<21, // Debug Store
  ACPI  = 1<<22, // Thermal Monitor & Software Controlled Clock
  MMX   = 1<<23, // MultiMedia eXtension
  FXSR  = 1<<24, // Fast Floating Point Save & Restore
  SSE   = 1<<25, // Streaming SIMD Extension 1
  SSE2  = 1<<26, // Streaming SIMD Extension 2
  SS    = 1<<27, // Self Snoop
  HTT   = 1<<28, // Hyper Threading Technology
  TM    = 1<<29, // Thermal Monitor
  PBE   = 1<<31, // Pend Break Enabled
};
/**
 * This will retrieve the CPU features available
 * \return The content of the edx register containing available features
 */
uint32_t cpuid_features()
{
  uint32_t eax, ebx, ecx, edx;
  cpuid( 1, eax, ebx, ecx, edx );
  return edx;
}

/**
 * Reference:
 * http://datasheets.chipdb.org/Intel/x86/CPUID/24161821.pdf
 * http://www.flounder.com/cpuid_explorer2.htm
 */
enum CpuidExtendedFeatures
{
  SSE3  = 1<< 0, // Streaming SIMD Extension 3
  MW    = 1<< 3, // Mwait instruction
  CPL   = 1<< 4, // CPL-qualified Debug Store
  VMX   = 1<< 5, // VMX
  EST   = 1<< 7, // Enhanced Speed Test
  TM2   = 1<< 8, // Thermal Monitor 2
  L1    = 1<<10, // L1 Context ID
  CAE   = 1<<13, // CompareAndExchange 16B
};
/**
 * This will retrieve the extended CPU features available
 * \return The content of the ecx register containing available extended features
 */
uint32_t cpuid_extended_features()
{
  uint32_t eax, ebx, ecx, edx;
  cpuid( 1, eax, ebx, ecx, edx );
  return ecx;
}

/**
 * Retrieve the processor name.
 * \param name Preallocated string containing at least room for 13 characters. Will
 *             contain the name of the processor.
 */
void cpuid_procname( char* name )
{
  name[12] = 0;
  uint32_t max_op;
  cpuid( 0, max_op, (uint32_t&)name[0], (uint32_t&)name[8], (uint32_t&)name[4] );
}

Sample usage

And a sample of how to use it:

#include <cstdlib>
#include <iostream>

int main( int, char** )
{
  char procname[13];
  cpuid_procname(procname);
  std::cout << "Processor name: " << procname << std::endl;
  std::cout << std::endl;
  std::cout << "Max cpuid call: " << cpuid_maxcall() << std::endl;
  std::cout << std::endl;
  std::cout << "Processor features:" << std::endl;
  std::cout << "  FPU   = " << std::boolalpha << (bool)(cpuid_features() & FPU  ) << std::endl;
  std::cout << "  VME   = " << std::boolalpha << (bool)(cpuid_features() & VME  ) << std::endl;
  std::cout << "  DE    = " << std::boolalpha << (bool)(cpuid_features() & DE   ) << std::endl;
  std::cout << "  PSE   = " << std::boolalpha << (bool)(cpuid_features() & PSE  ) << std::endl;
  std::cout << "  TSC   = " << std::boolalpha << (bool)(cpuid_features() & TSC  ) << std::endl;
  std::cout << "  MSR   = " << std::boolalpha << (bool)(cpuid_features() & MSR  ) << std::endl;
  std::cout << "  PAE   = " << std::boolalpha << (bool)(cpuid_features() & PAE  ) << std::endl;
  std::cout << "  MCE   = " << std::boolalpha << (bool)(cpuid_features() & MCE  ) << std::endl;
  std::cout << "  CX8   = " << std::boolalpha << (bool)(cpuid_features() & CX8  ) << std::endl;
  std::cout << "  APIC  = " << std::boolalpha << (bool)(cpuid_features() & APIC ) << std::endl;
  std::cout << "  SEP   = " << std::boolalpha << (bool)(cpuid_features() & SEP  ) << std::endl;
  std::cout << "  MTRR  = " << std::boolalpha << (bool)(cpuid_features() & MTRR ) << std::endl;
  std::cout << "  PGE   = " << std::boolalpha << (bool)(cpuid_features() & PGE  ) << std::endl;
  std::cout << "  MCA   = " << std::boolalpha << (bool)(cpuid_features() & MCA  ) << std::endl;
  std::cout << "  CMOV  = " << std::boolalpha << (bool)(cpuid_features() & CMOV ) << std::endl;
  std::cout << "  PAT   = " << std::boolalpha << (bool)(cpuid_features() & PAT  ) << std::endl;
  std::cout << "  PSE36 = " << std::boolalpha << (bool)(cpuid_features() & PSE36) << std::endl;
  std::cout << "  PSN   = " << std::boolalpha << (bool)(cpuid_features() & PSN  ) << std::endl;
  std::cout << "  CLFSH = " << std::boolalpha << (bool)(cpuid_features() & CLFSH) << std::endl;
  std::cout << "  DS    = " << std::boolalpha << (bool)(cpuid_features() & DS   ) << std::endl;
  std::cout << "  ACPI  = " << std::boolalpha << (bool)(cpuid_features() & ACPI ) << std::endl;
  std::cout << "  MMX   = " << std::boolalpha << (bool)(cpuid_features() & MMX  ) << std::endl;
  std::cout << "  FXSR  = " << std::boolalpha << (bool)(cpuid_features() & FXSR ) << std::endl;
  std::cout << "  SSE   = " << std::boolalpha << (bool)(cpuid_features() & SSE  ) << std::endl;
  std::cout << "  SSE2  = " << std::boolalpha << (bool)(cpuid_features() & SSE2 ) << std::endl;
  std::cout << "  SS    = " << std::boolalpha << (bool)(cpuid_features() & SS   ) << std::endl;
  std::cout << "  HTT   = " << std::boolalpha << (bool)(cpuid_features() & HTT  ) << std::endl;
  std::cout << "  TM    = " << std::boolalpha << (bool)(cpuid_features() & TM   ) << std::endl;
  std::cout << std::endl;
  std::cout << "Processor extended features:" << cpuid_extended_features() << std::endl;
  std::cout << "  SSE3 = " << std::boolalpha << (bool)(cpuid_extended_features() & SSE3) << std::endl;
  std::cout << "  MW   = " << std::boolalpha << (bool)(cpuid_extended_features() & MW  ) << std::endl;
  std::cout << "  CPL  = " << std::boolalpha << (bool)(cpuid_extended_features() & CPL ) << std::endl;
  std::cout << "  VMX  = " << std::boolalpha << (bool)(cpuid_extended_features() & VMX ) << std::endl;
  std::cout << "  EST  = " << std::boolalpha << (bool)(cpuid_extended_features() & EST ) << std::endl;
  std::cout << "  TM2  = " << std::boolalpha << (bool)(cpuid_extended_features() & TM2 ) << std::endl;
  std::cout << "  L1   = " << std::boolalpha << (bool)(cpuid_extended_features() & L1  ) << std::endl;
  std::cout << "  CAE  = " << std::boolalpha << (bool)(cpuid_extended_features() & CAE ) << std::endl;
  
  return EXIT_SUCCESS;
}
Overview of the strict aliasing rules

Understanding aliasing and restriction

We will start our journey by digging an obscure paragraph from the ISO C89 standard (propagated to the following C and C++ standards). This paragraph (6.5 §7) describes what are known as the strict aliasing rules:

An object shall have its stored value accessed only by an lvalue expression that has one of the following types:

  • a type compatible with the effective type of the object,
  • a qualified version of a type compatible with the effective type of the object,
  • a type that is the signed or unsigned type corresponding to the effective type of the object,
  • a type that is the signed or unsigned type corresponding to a qualified version of the effective type of the object,
  • an aggregate or union type that includes one of the aforementioned types among its members (including, recursively, a member of a subaggregate or contained union), or
  • a character type.

At first, it may seem a bit obscure. What it really means, is that you cannot freely alias (or interleave, overlap) pointers and dereference them. For instance, the following code is illegal:

uint16_t a;
uint8_t bytes = (uint8_t*)&a;
bytes[0] = 1;
bytes[1] = 1;

Accessing parts of a uint16_t from uint8_t does not fall in any strict-aliasing rules mentioned above. This is what is called type punning.

If we list the rules one after the other, here are some of the allowed ways to access our uint16_t:

  • uint16_t*
  • uint16_t* const
  • uint16_t* volatile
  • uint16_t* const volatile
  • int16_t*
  • int16_t* const
  • int16_t* volatile
  • int16_t* const volatile
  • union { uint16_t a; const int16_t b; }*
  • char*
  • unsigned char*

Okay, so now that we have some knowledge on the subject, there is a direct consequence of the strict aliasing rules:

Two pointers which types does not fall in the strict aliasing rules shall not alias.

This implication is very important for understanding the restrict pointers concept. The compiler will constantly make assumptions about pointer aliasing to try to perform optimizations. The more information are available, the more optimizations will be possible. Thus, the worsts cases are when we are manipulating pointers of aliasable types - char* and unsigned char* being aliasable with everything, they are to be avoided.

Hopefully, ISO C99 introduced the restrict keyword:

An object that is accessed through a restrict-qualified pointer has a special association with that pointer. This association requires that all accesses to that object use, directly or indirectly, the value of that particular pointer. The intended use of the restrict qualifier is to promote optimization, and deleting all instances of the qualifier from all preprocessing translation units composing a conforming program does not change its meaning (i.e., observable behavior).

As a side note, C++ does not (at he time this article was written) supports restrict pointers (since C99 is not part of C++98/03). You can nevertheless use __restrict__ or __restrict on most modern compilers (GCC/MSVC/ICC) without any problem.

A simple example

Let's have a look at a very simple example:

int function( int* a, int* b )
{
  *a = 1;
  *b = 2;
  return *a;
}

Two cases are possible here:

  • a and b may point to the same memory location. Then we cannot know what to return without actually loading back *a from memory.
  • a and b points to different memory locations. Then we would like the function to constantly return 1.

Building the code with g++ -S -c aliasing.cpp -fstrict-aliasing -O3 should produce the following output (g++ 4.0.1)

function:
  pushl %ebp           #
  movl  %esp, %ebp     #
  movl  8(%ebp), %eax  # %eax = a
  movl  12(%ebp), %edx # %edx = b
  movl  $1, (%eax)     # *a = 1
  movl  $2, (%edx)     # *b = 2
  movl  (%eax), %eax   # Reload *a in %eax (return register)
  leave                #
  ret                  #

The output clearly illustrates the case 1 mentioned above. Without aliasing information about a and b the compiler cannot produce optimal code.

Now if we are sure that a and b will never alias, we can declare them as restrict:

int function( int* __restrict__ a, int* __restrict__ b )
{
  *a = 1;
  *b = 2;
  return *a;
}

Assembly output:

function:
  pushl %ebp           #
  movl  %esp, %ebp     #
  movl  8(%ebp), %eax  # %eax = a
  movl  $1, (%eax)     # *a = 1
  movl  12(%ebp), %eax # %eax = b
  movl  $2, (%eax)     # *b = 2
  movl  $1, %eax       # return 1 in %eax (return register)
  leave                #
  ret                  #

This is what we expected, the compiler was able to remove the useless load of *a from memory.

A more complex example

Let's now consider a more subtle example. You should know that the worst speed efficient operations possible are those involving loads and stores from and to memory. This means that to obtain the best possible results, we should try to follow the Load -> Compute -> Store principle that maximizes prefetching and prevents pipeline stalls.

In the following example, we are looping reading and writing aliasable pointers. Without further restrict information, the compiler will have to perform a load during each loop iteration, this is the worst possible scenario.

void function( int* a, int* b )
{
  for ( int i=0; i<10; ++i )
    *a += *b;
}

Assembly output:

function:
  pushl %ebp           # backup stack pointer
  xorl  %edx, %edx     # loop register %edx = 0
  movl  %esp, %ebp     # setup new stack
  pushl %esi           # backup %esi
  movl  8(%ebp), %esi  # %esi = a (from stack)
  movl  12(%ebp), %ecx # %ecx = b (from stack)
  movl  (%esi), %eax   # %eax = *a
loop:                  #
  addl  (%ecx), %eax   # Load *b and add it to %eax
  incl  %edx           # increment loop register %edx
  cmpl  $10, %edx      # comapre %edx to 10
  movl  %eax, (%esi)   # store %eax to *a
  jne   loop           # loop if %edx!=10
  popl  %esi           # restore %esi
  leave                #
  ret                  #

Now if we know a and b won't ever alias, we can try the following code out:

void function( int* __restrict__ a, int* __restrict__ b )
{
  for ( int i=0; i<10; ++i )
    *a += *b;
}

Assembly output:

function:
  pushl %ebp              # backup stack pointer
  movl  %esp, %ebp        # setup new stack
  movl  12(%ebp), %eax    # %eax = b
  pushl %edi              # backup %edi
  movl  8(%ebp), %edi     # %edi = a
  pushl %esi              # backup %esi
  xorl  %esi, %esi        # loop register %esi = 0
  movl  (%eax), %eax      # %eax = *b
  movl  (%edi), %ecx      # %ecx = *a
loop:                     #
  incl  %esi              # increment loop register %esi
  leal  (%ecx,%eax), %edx # %edx = %ecx+%eax
  cmpl  $10, %esi         # compare %esi to 10
  movl  %edx, %ecx        # %edx = %ecx
  jne   loop              # loop if %esi!=10
  movl  %edx, (%edi)      # store %edx to *a
  popl  %esi              # restore %esi
  popl  %edi              # restore %edi
  leave                   #
  ret                     #

We were clearly able to extract the store from the loop, following the Load -> Compute -> Store principle.

Conclusion

Strict aliasing rules allows the compiler to perform some optimizations by assuming that some pointers do not alias. However, the programmer has to handle special cases when dealing with aliasable types. This involves tricky specification of restricted and non-restricted pointers. Matrix multiplications are a typical example where left and right hand side pointers will not alias, and agressive restrict pointer optimizations will be very efficient.

Understanding virtuality

This article is still under construction. I need to add the text ;)

The simple case

Example 1

class Foo
{
public:
  Foo() : a(1), b(2), c(3) {}

public:
  void f() { std::cout << "Foo::f()" << std::endl; }
  void g() { std::cout << "Foo::g()" << std::endl; }

public:
  int a;
  int b;
  int c;
};

int main( int, char** )
{
  Foo foo;
  
  std::cout << "sizeof(Foo)= " << sizeof(Foo) << std::endl;
  std::cout << std::endl;
  std::cout << "(int*)&foo+0=    " << (int*)&foo+0    << std::endl;
  std::cout << "&foo.a=          " << &foo.a          << std::endl;
  std::cout << "foo.a=           " << foo.a           << std::endl;
  std::cout << "*((int*)&foo+0)= " << *((int*)&foo+0) << std::endl;
  std::cout << std::endl;
  std::cout << "&foo.b=          " << &foo.b          << std::endl;
  std::cout << "(int*)&foo+1=    " << (int*)&foo+1    << std::endl;
  std::cout << "foo.b=           " << foo.b           << std::endl;
  std::cout << "*((int*)&foo+1)= " << *((int*)&foo+1) << std::endl;
  std::cout << std::endl;
  std::cout << "&foo.c=          " << &foo.c          << std::endl;
  std::cout << "(int*)&foo+2=    " << (int*)&foo+2    << std::endl;
  std::cout << "foo.c=           " << foo.c           << std::endl;
  std::cout << "*((int*)&foo+2)= " << *((int*)&foo+2) << std::endl;
  
  return EXIT_SUCCESS;
}

Output:

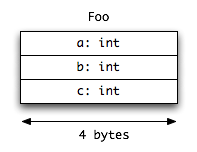
sizeof(Foo)= 12

(int*)&foo+0=    0xbffff7c4
&foo.a=          0xbffff7c4
foo.a=           1
*((int*)&foo+0)= 1

&foo.b=          0xbffff7c8
(int*)&foo+1=    0xbffff7c8
foo.b=           2
*((int*)&foo+1)= 2

&foo.c=          0xbffff7cc
(int*)&foo+2=    0xbffff7cc
foo.c=           3
*((int*)&foo+2)= 3

Introducing virtuality

Example 2

class Foo
{
public:
  Foo() : a(1), b(2), c(3) {}

public:
  virtual void f() { std::cout << "Foo::f()" << std::endl; }
  virtual void g() { std::cout << "Foo::g()" << std::endl; }

public:
  int a;
  int b;
  int c;
};

int main( int, char** )
{
  Foo foo;
  
  std::cout << "sizeof(Foo)= " << sizeof(Foo) << std::endl;
  std::cout << std::endl;
  std::cout << "(int (***)(...))&foo+0=    " << (int (***)(...))&foo+0    << std::endl;
  std::cout << "&foo._vptr=                " << &foo._vptr                << std::endl;
  std::cout << "foo._vptr=                 " << foo._vptr                 << std::endl;
  std::cout << "*((int (***)(...))&foo+0)= " << *((int (***)(...))&foo+0) << std::endl;
  std::cout << std::endl;
  std::cout << "(int*)&foo+1=    " << (int*)&foo+1    << std::endl;
  std::cout << "&foo.a=          " << &foo.a          << std::endl;
  std::cout << "foo.a=           " << foo.a           << std::endl;
  std::cout << "*((int*)&foo+1)= " << *((int*)&foo+1) << std::endl;
  std::cout << std::endl;
  std::cout << "&foo.b=          " << &foo.b          << std::endl;
  std::cout << "(int*)&foo+2=    " << (int*)&foo+2    << std::endl;
  std::cout << "foo.b=           " << foo.b           << std::endl;
  std::cout << "*((int*)&foo+2)= " << *((int*)&foo+2) << std::endl;
  std::cout << std::endl;
  std::cout << "&foo.c=          " << &foo.c          << std::endl;
  std::cout << "(int*)&foo+3=    " << (int*)&foo+3    << std::endl;
  std::cout << "foo.c=           " << foo.c           << std::endl;
  std::cout << "*((int*)&foo+3)= " << *((int*)&foo+3) << std::endl;
  
  return EXIT_SUCCESS;
}

Output:

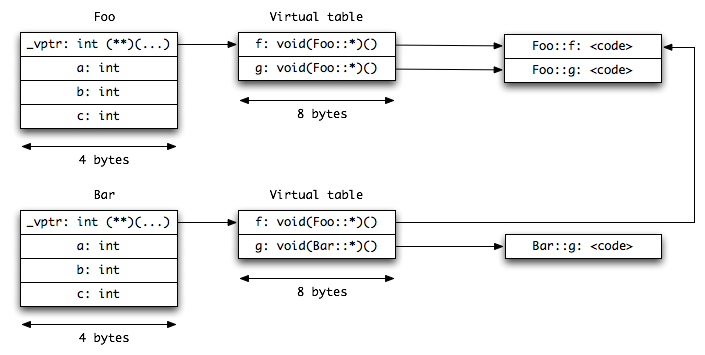
sizeof(Foo)= 16

(int (***)(...))&foo+0=    0xbffff7c0
&foo._vptr=                0xbffff7c0
foo._vptr=                 0x2040
*((int (***)(...))&foo+0)= 0x2040

(int*)&foo+1=    0xbffff7c4
&foo.a=          0xbffff7c4
foo.a=           1
*((int*)&foo+1)= 1

&foo.b=          0xbffff7c8
(int*)&foo+2=    0xbffff7c8
foo.b=           2
*((int*)&foo+2)= 2

&foo.c=          0xbffff7cc
(int*)&foo+3=    0xbffff7cc
foo.c=           3
*((int*)&foo+3)= 3
class Foo
{
public:
  Foo() : a(1), b(2), c(3) {}

public:
  virtual void f() { std::cout << "Foo::f()" << std::endl; }
  virtual void g() { std::cout << "Foo::g()" << std::endl; }

public:
  int a;
  int b;
  int c;
};

union MemberPtrMixin
{
  void (Foo::*pfn)(); // The real type of our Foo methods
  int (*pvt)(...);    // The global type of a vtable entry
};

int main( int, char** )
{
  Foo foo;
  
  std::cout << "foo.f()= "; (foo.*(&Foo::f))();
  std::cout << "foo.g()= "; (foo.*(&Foo::g))();
  
  std::cout << std::endl;
  
  std::cout << "(foo.*(&Foo::f))()= "; (foo.*(&Foo::f))();
  std::cout << "(foo.*(&Foo::g))()= "; (foo.*(&Foo::g))();
  
  std::cout << std::endl;
  
  MemberPtrMixin pmb_f;
  MemberPtrMixin pmb_g;
  pmb_f.pvt = foo._vptr[0];
  pmb_g.pvt = foo._vptr[1];
  std::cout << "(foo.*pmb_f.pfn)()= "; (foo.*pmb_f.pfn)();
  std::cout << "(foo.*pmb_g.pfn)()= "; (foo.*pmb_g.pfn)();
  
  return EXIT_SUCCESS;
}

Output:

foo.f()= Foo::f()
foo.g()= Foo::g()

(foo.*(&Foo::f))()= Foo::f()
(foo.*(&Foo::g))()= Foo::g()

(foo.*pmb_f.pfn)()= Foo::f()
(foo.*pmb_g.pfn)()= Foo::g()

Final example

Example 3

class Foo
{
public:
  Foo() : a(1), b(2), c(3) {}

public:
  virtual void f() { std::cout << "Foo::f()" << std::endl; }
  virtual void g() { std::cout << "Foo::g()" << std::endl; }

public:
  int a;
  int b;
  int c;
};

class Bar : public Foo
{
public:
  virtual void g() { std::cout << "Bar::g()" << std::endl; }
};

union MemberPtrMixin
{
  void (Bar::*pfn)(); // The real type of our Bar methods
  int (*pvt)(...);    // The global type of a vtable entry
};

int main( int, char** )
{
  Bar bar;
  
  std::cout << "bar.f()= "; (bar.*(&Bar::f))();
  std::cout << "bar.g()= "; (bar.*(&Bar::g))();
  
  std::cout << std::endl;
  
  std::cout << "(bar.*(&Bar::f))()= "; (bar.*(&Bar::f))();
  std::cout << "(bar.*(&Bar::g))()= "; (bar.*(&Bar::g))();
  
  std::cout << std::endl;
  
  MemberPtrMixin pmb_f;
  MemberPtrMixin pmb_g;
  pmb_f.pvt = bar._vptr[0];
  pmb_g.pvt = bar._vptr[1];
  std::cout << "(bar.*pmb_f.pfn)()= "; (bar.*pmb_f.pfn)();
  std::cout << "(bar.*pmb_g.pfn)()= "; (bar.*pmb_g.pfn)();
  
  return EXIT_SUCCESS;
}

Output:

bar.f()= Foo::f()
bar.g()= Bar::g()

(bar.*(&Bar::f))()= Foo::f()
(bar.*(&Bar::g))()= Bar::g()

(bar.*pmb_f.pfn)()= Foo::f()
(bar.*pmb_g.pfn)()= Bar::g()